Overview
Welcome to your first PCB design tutorial in Flux! We'll be going through the process of building an "ON AIR board" with the following features:
- Intensity adjustment by adjusting a feedback loop with a slider
- Push button for on and off
- USB-C powered
- Powered by a single buck converter
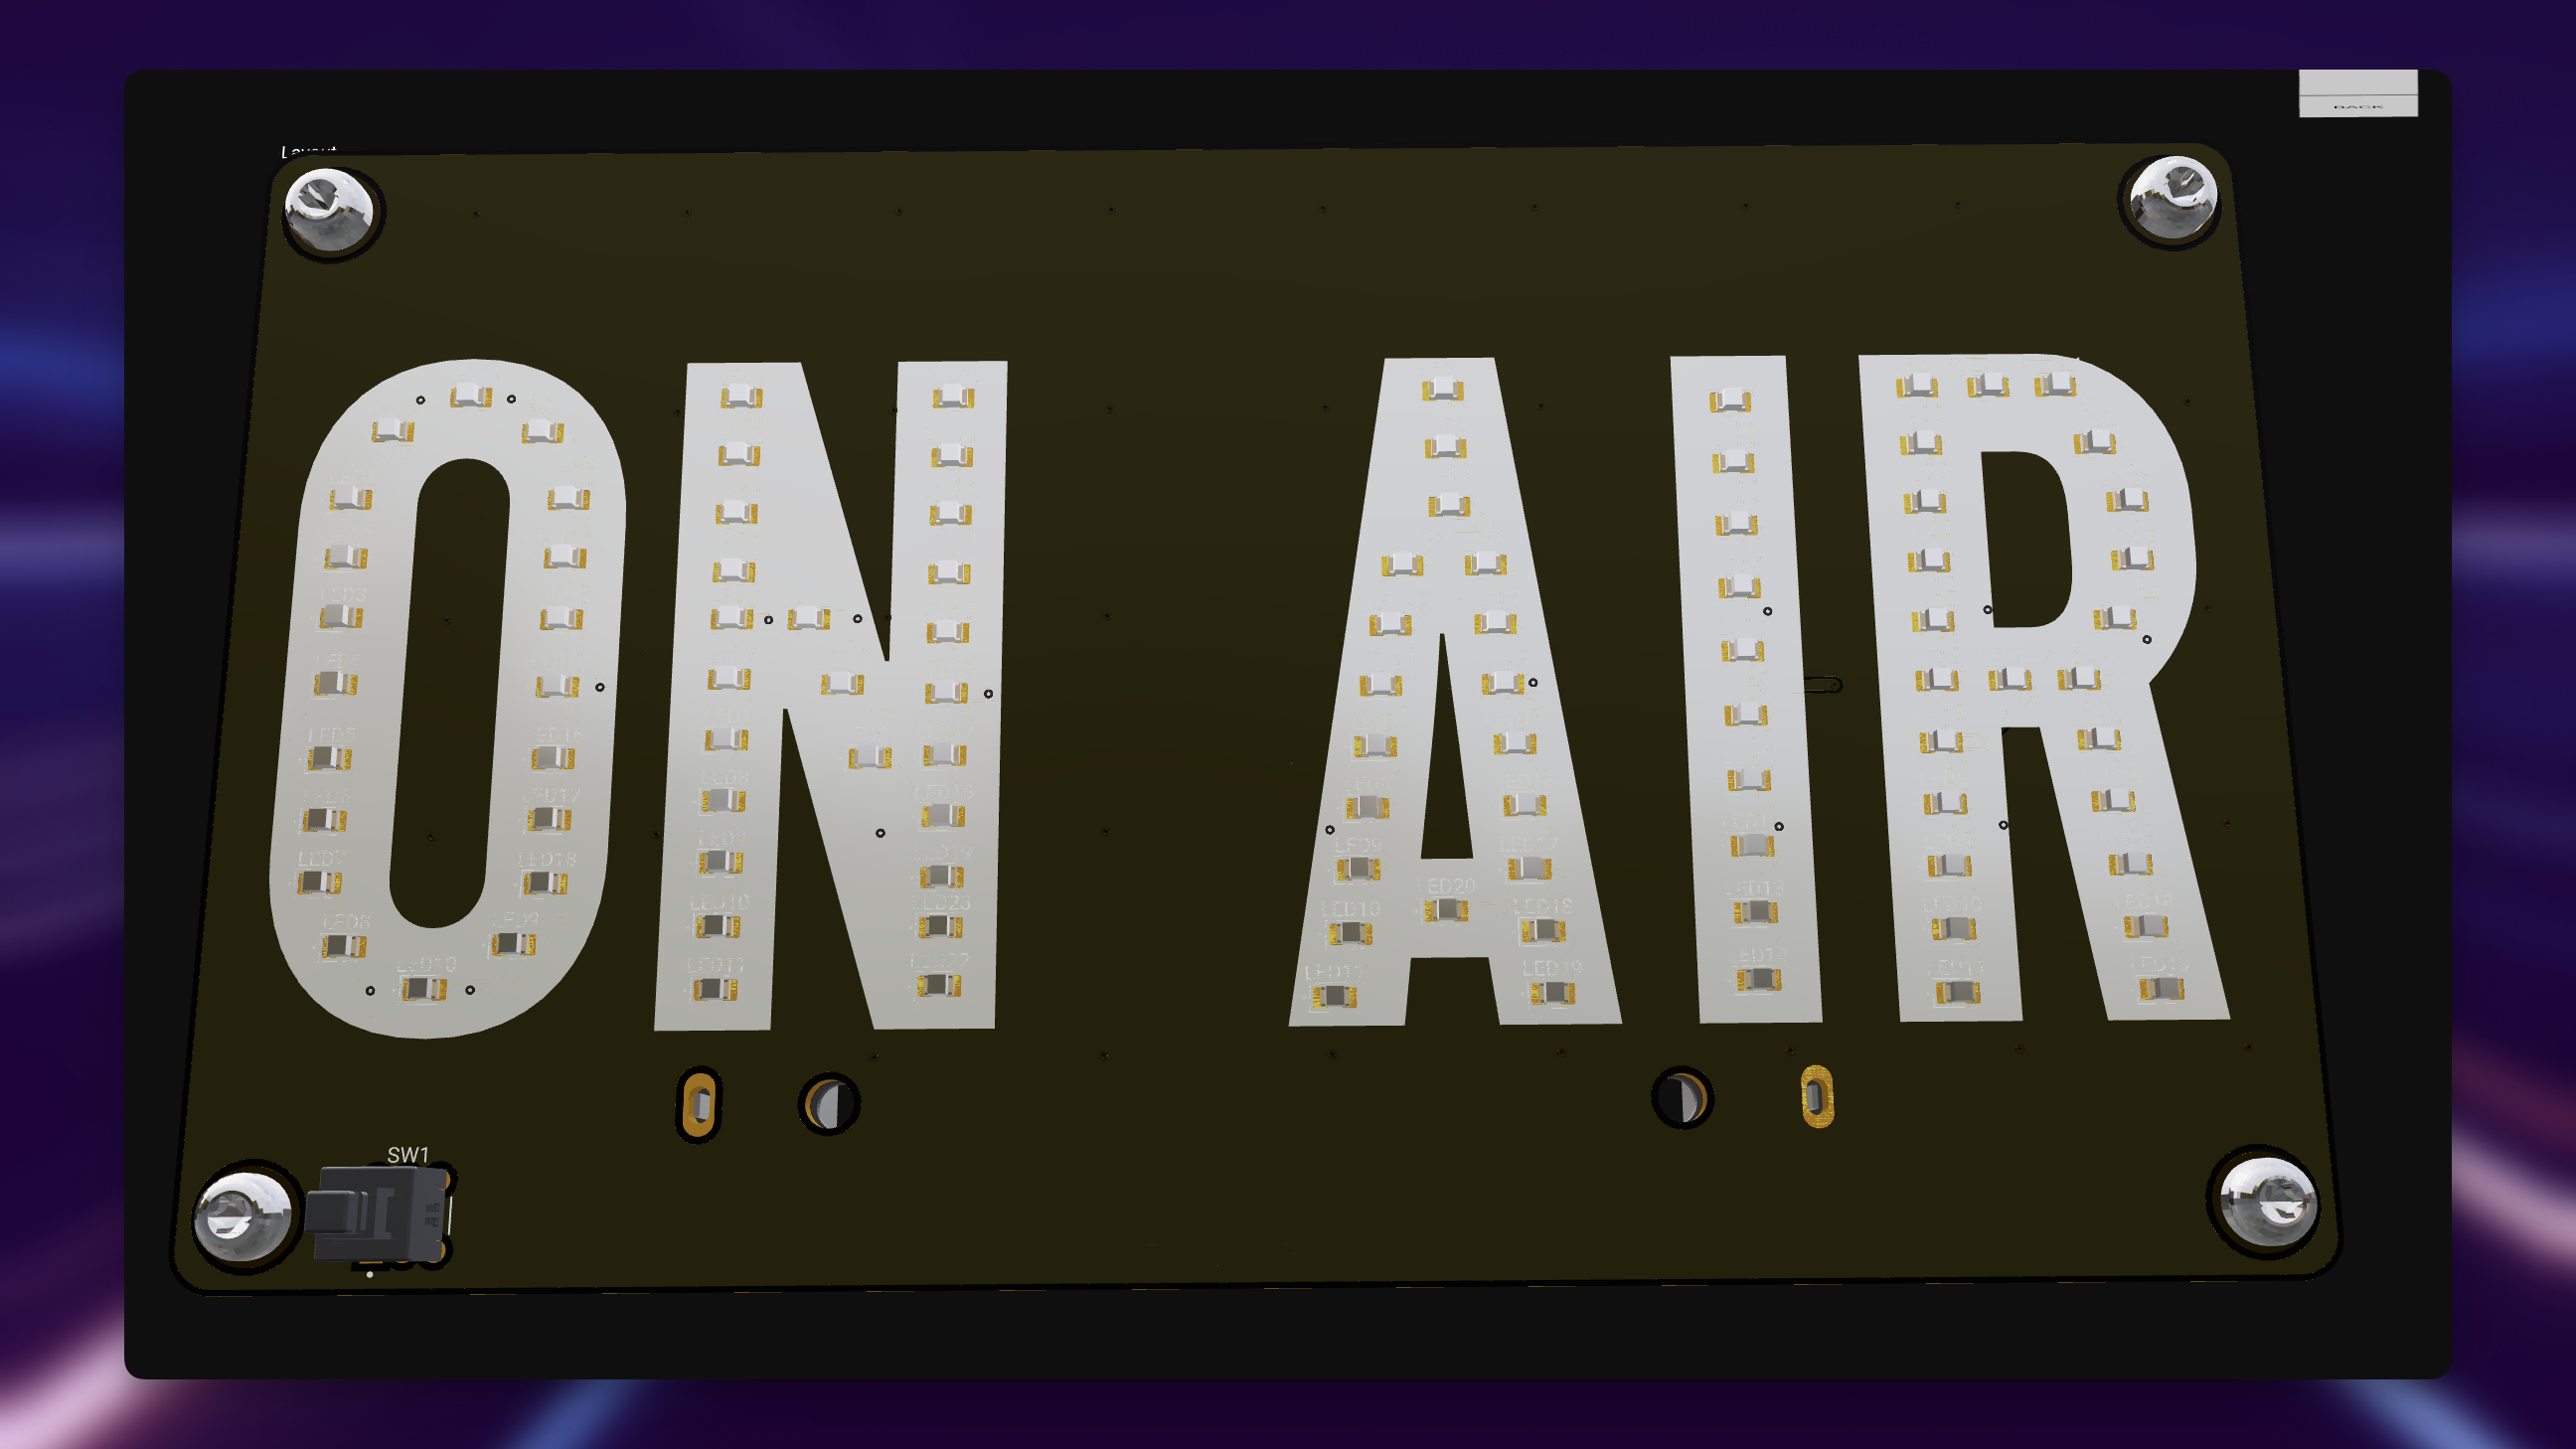
We'll be basing our project off a pre-existing version that already has these features, and incorporating an additional ESP32 board, allowing for control of intensity digitally instead of a potentiometer.
Tutorial Agenda
In this first section of the tutorial, we'll be covering everything you need to know to set up your new project:
- Basic project setup
- Your Flux profile
- Starting a new project
- Modern workflows in Flux
Project Setup
Before Starting: Your Flux Profile
The profile page can be thought of as your personal portfolio. Here you can share your profile URL so others can see what you've been working on. Your profile will showcase every project you've made public.
You can access the profile page by opening the top right menu anywhere in Flux and clicking on "Profile". Your profile's URL will be: flux.ai/[username], for example flux.ai/nico.
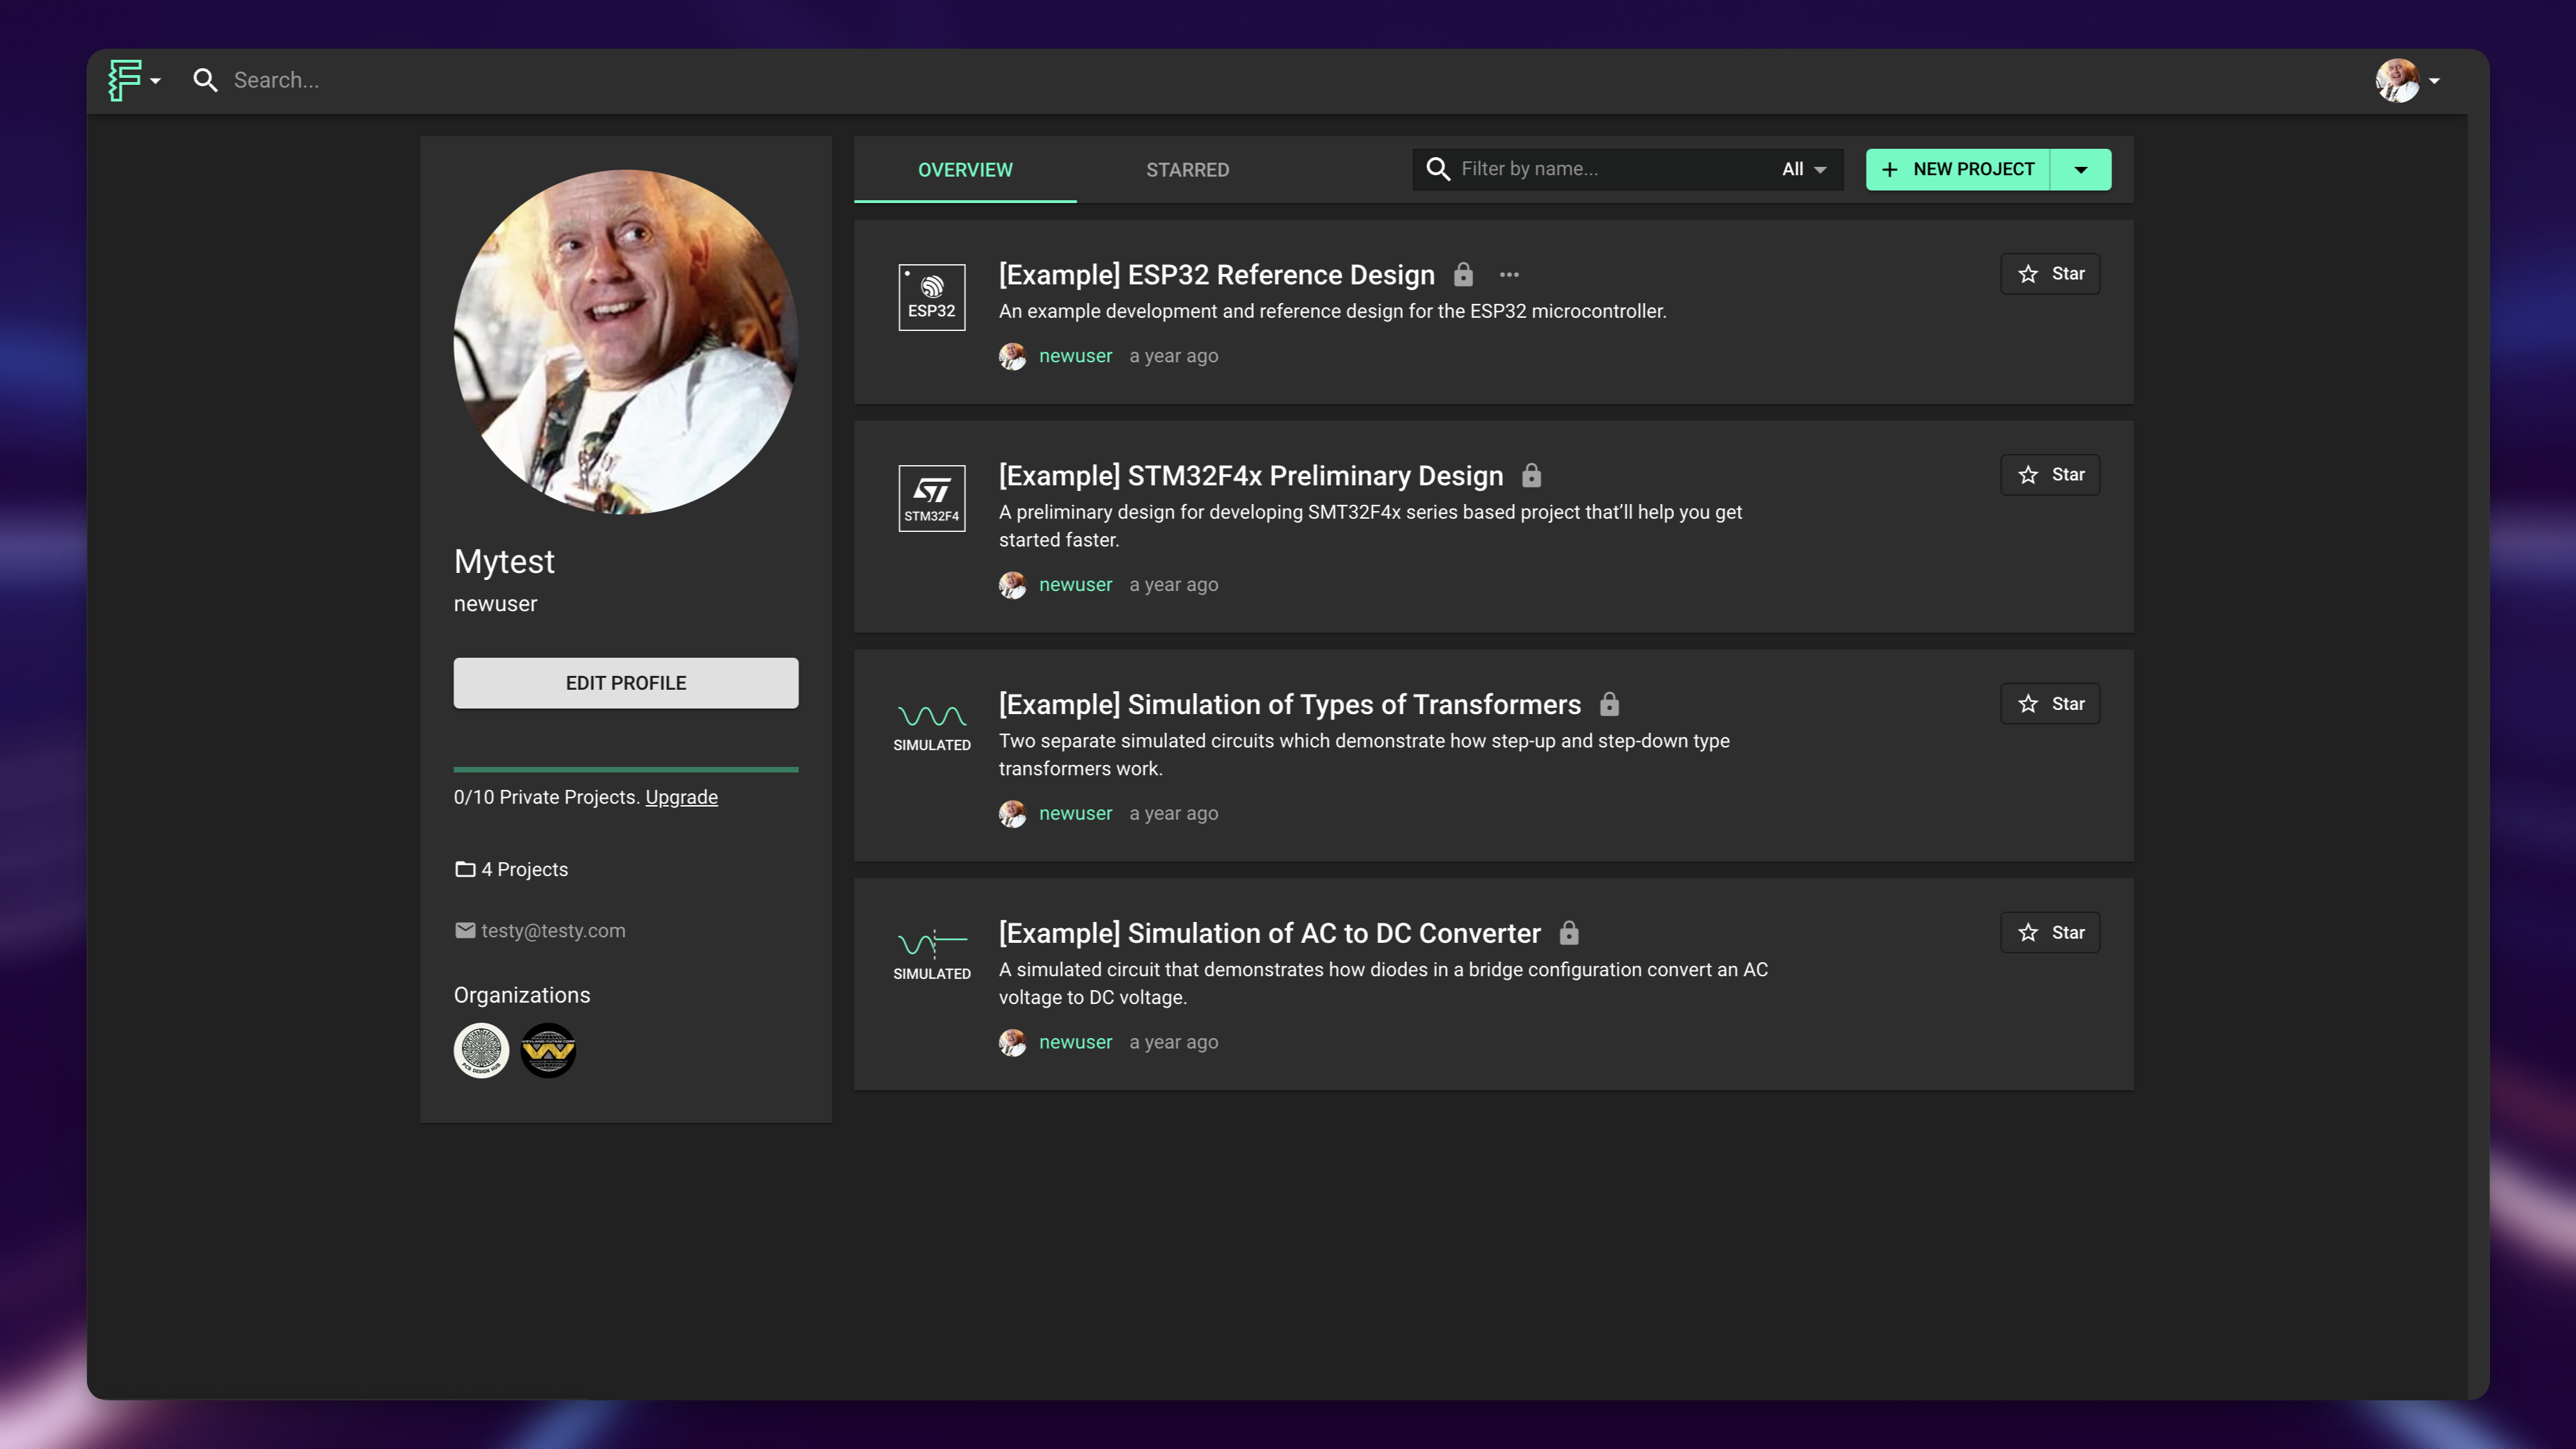
In the profile page, you'll also find:
- Search bar: located at the top left corner; search all publicly available projects and users.
- Filter bar: situated at the top of the projects list; filter and find specific projects in your list.
- Project list: located at the bottom of the main menu; a collection of all the projects you've created, contributed to, or starred.
Starting a New Project
At Flux, we're big believers in the power of reusability. When we leverage each other's work, we can save precious design time and focus on where we add the most value. There are several ways to find existing projects we can leverage our work from. We've done a full tutorial on this subject, but here's a brief summary:
- To find resources and projects to clone: go to Flux's landing page > explore > projects that you can clone. You can then sort by templates, such as Raspberry Pi hats or projects explaining Flux guidance. Other manufacturers also have templates with their design rule constraints premade, which is good if you know you'll be working with a particular manufacturer.
- The featured projects page contains a list of community projects manually curated by the Flux team.
- You can also use the search bar in the top left of your profile page to search through every project publicly available in Flux.
- Your account comes preloaded with examples. You can use them to explore the main features of Flux.
You can also start your project from a blank slate if you prefer.
Pro-Tip! While cloning and templates help you start a project, Modules allow you to drag in complex, pre-laid-out circuit blocks (like the buck converter used in this tutorial) directly from the library. We will walk through how to build and publish your own custom modules in the next step: Schematic Design.
Clone an existing project
Best when you wish to continue or modify an existing project, maintaining its layout and content.
How to Start:
- Navigate to File > Clone Project in Flux.
Notes:
- Cloning includes all project elements except comments.
- Requires viewing permissions of the original project.
- Cloning and forking are similar, but forking retains a link to the original project.
Using Templates
Suitable for projects where a standard layout or rule set is often reused.
How to Start:
- Choose a template from your saved project templates in Flux.
Notes:
- Saves time by using predefined settings like designators or font sizes.
- You can convert any of your projects into a template for future use.
New blank document
Ideal for custom projects where you want full control from the beginning.
How to Start:
- Select the option to create a new project from scratch in Flux.
Notes:
- Provide a name and description for your project.
- Add an image: Go to Assets > Add > Add Item > Select Image.
- Set project permissions, including collaborators.
Each method offers unique advantages depending on your project's requirements. Starting from scratch gives the most freedom, cloning leverages existing work, and using templates streamlines the creation of projects with similar setups.
For this project, we've cloned a pre-existing board that has the graphics and LED layout. After cloning we've added our own buck converter.
Setting Project Details for AI Context
It's good practice to add the following properties to guide Flux and any other potential users looking into the project. This allows Flux to understand your design goals and provide accurate technical advice.
- Project Description: Use the description field not just for other users, but to tell Flux exactly what you are building (e.g., "A digitally controlled ON AIR sign").
- Custom Properties: Beyond basic text, you can add specific Properties. With the schematic canvas open and no element selected, in the inspector panel on the right, under "properties", click ADD and set the following properties for this project:
- Operating voltage: 5VDC, or 4.2VDC from lithium-ion
- Connectivity requirements: Wifi
How to Access and Use Flux AI
During the setup and early design phase, you can interact with Flux in two primary ways:
- The Chat Panel: Best for high-level architectural questions, such as asking, "
How do I power this project from USB-C and lithium ion battery?". Flux can suggest specific part numbers (like the TP4056) and and circuit requirements (like decoupling capacitors) based on your project properties. - The Canvas & Component Menu: You can access Flux features directly on the canvas by right-clicking a component or hovering over the Flux menu. This allows you to:
- Explain Lead/Component: Ask the AI to explain what a specific part does.
- Find Replacements: Request alternative parts to minimize costs or find better availability.
- Direct Interaction: Use the "Ask a question" feature while hovering over the AI icon to query specific parts of your layout.
Modern Workflows
Being an online platform, Flux is already built for collaboration and can support the kinds of workflows found in modern engineering teams.
Most modern PCB designs are part of a multidisciplinary effort. PCB designers, mechanical engineers, and manufacturers will need to provide input on a design. Flux was built to support this type of collaboration that professional designers require.
Some Flux features that support collaboration include Sharing and permissions, and comments.
These functionalities enable real-world engineering workflows, allowing for effective team communication and project management. Understanding these functionalities early on will allow for smoother integration into modern, professional engineering environments.
Collaboration - Sharing and Permissions
Sharing and Permissions' importance to a modern workflow:
- Control and Flexibility: In fast-paced environments, teams need precise control over project access. Flux allows teams to manage who can view, edit, or comment on projects. This control is crucial in multi-tiered teams where different members have varying roles.
- Ease of Access: Sharing is simplified to copying and sending a URL, streamlining the collaboration process. However, the platform ensures security by requiring that recipients have the appropriate access level. Here's more information about the different access levels.
- Customization: Teams can keep projects private, share them with select users, or make them public, adapting to the project's confidentiality needs.
Commenting
How commenting benefits a modern workflow:
- Contextual Feedback: Direct commenting on schematics or the PCB editor in Flux provides immediate, context-rich feedback. This feature is invaluable in multidisciplinary teams where clear communication reduces errors and enhances understanding.
- Interactive Dialogue: The ability to respond, resolve, or delete comments directly within the project streamlines the review and revision process, making it more efficient and integrated.
In Flux, you can add comments directly on the schematics or PCB editor. This can be done by pressing:
Right-click -> Insert comment
We have a full guide on comments if you want to learn everything you can do with them.
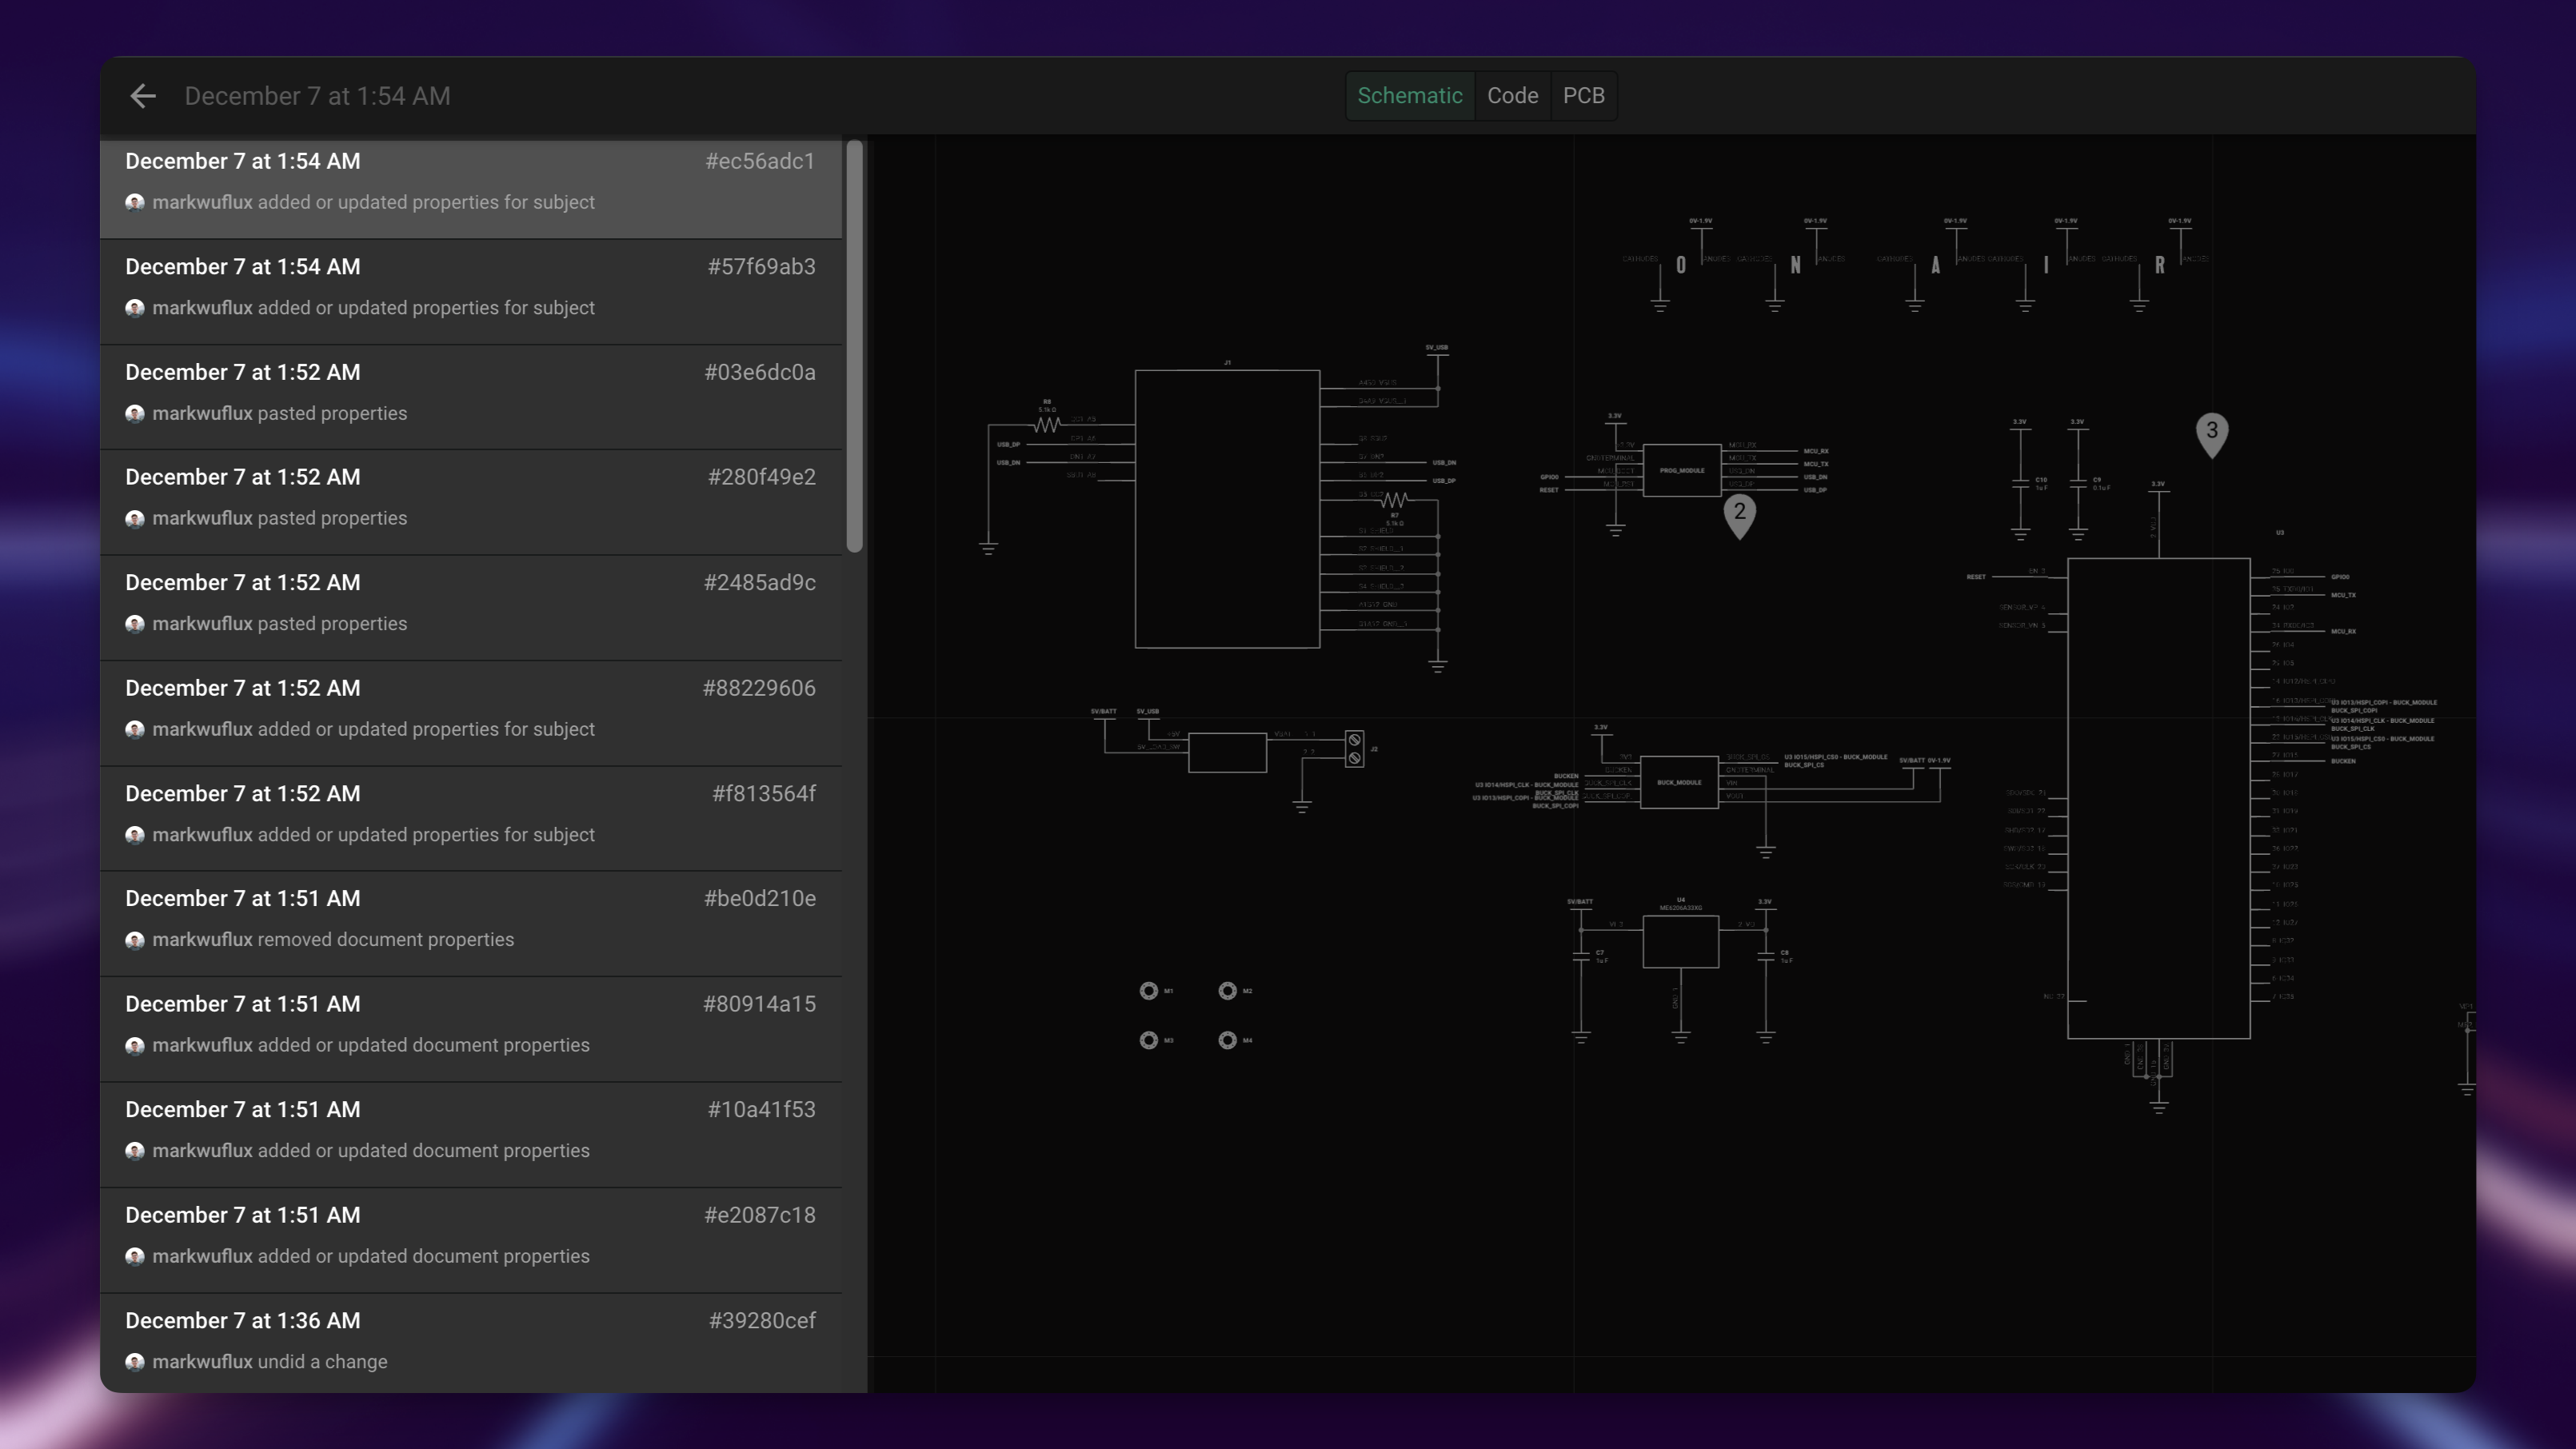
Version Control
Flux's version control system, automatically saves every modification, ensuring no detail is lost. Accessing the Change History provides a comprehensive view of the project's evolution, crucial for understanding the rationale behind changes and for learning from past decisions. Finally, the ability to view different versions of a project helps in assessing progress and setting future milestones, -essential for project management.
To access the Change History:
- Click on the Flux menu in the top left.
- Click on the "Change History" menu to access a list of previous versions of your project.
- The left-side menu will show a list with every version (change) in the project. Select one to see how the project looked at that point in time.
Troubleshooting Common Issues
Project Creation Problems
- Can't find a template: Try using the search function with different keywords or check the featured projects page
- Clone button not available: Ensure you have viewing permissions for the project you're trying to clone
- Project not appearing in your list: Check that you're signed in with the correct account and refresh the page
Collaboration Challenges
- Collaborator can't access the project: Verify you've set the correct permission level and that you're using their correct email address
- Comments not appearing: Make sure you've saved your comment by pressing Enter and refresh the page if necessary
- Version history not showing changes: Some minor changes might not create a new version; try making a more substantial change
What's Next
Now that you've set up your project and understand the basic workflows in Flux, you're ready to move on to the next steps:
- Schematic Design - Learn how to create your circuit schematic
- PCB Layout and Routing - Discover how to place components and route traces
- Export and Manufacturing - Prepare your design for production
- Reusing Community Projects - Explore more ways to leverage existing designs
- Collaboration Deep Dive - Master advanced collaboration techniques