Importing Components from Other EDA Tools to Flux
Migrate your KiCAD EDA component library to Flux in a few steps.
Overview
Flux supports importing KiCad and Eagle formatted component libraries and parts to avoid duplicating work. You can import your own components or download KiCAD libraries from any of these platforms:
Flux supports KiCAD components up to version 5. Make sure the format of the part you want to import is KiCAD v4, KiCAD v5 or KiCAD v6.
Importing a Component
There are a few steps involved in importing a part. Some of these are optional, but the more information a part contains, the higher it will rank during part searches and the more useful it will be to you and other designers.
1- Import the .lib File
Go to your profile page, click on Flux menu on the top-left corner and then on "Import">"KiCAD parts". You'll then be prompted to select the .lib file you want to import. This process can also be initiated from the Schematic or PCB editors.

A browser tab will open once the selected part or libraries has been imported. You should see one terminal for every pin in the imported part. If you imported more than one part, Flux will create a new project for every part imported.
1.1 Adding Component Properties
Adding extra information to each part is important for a high-quality library. Use the inspector panel on the right side to update the description or add more properties like a datasheet, package case code, etc.
Adding the Manufacturer Part Number property is particularly important so Flux can automatically get pricing and availability for project's BoM on the biggest distributors (DigiKey, Mouser, etc)
2- Importing a Symbol
The imported ".lib" file should already include a symbol. You'll be able to see it in the top right corner, just make sure that no element has been selected with a double click on an empty place in the schematic canvas.
In the unlikely case your part doesn't contain one, Flux will create a standard rectangular symbol by default, or you can add a custom symbol if you prefer.
It is not mandatory to create a custom symbol. If no symbol is present in the assets menu, Flux will use a rectangle-shaped default symbol.
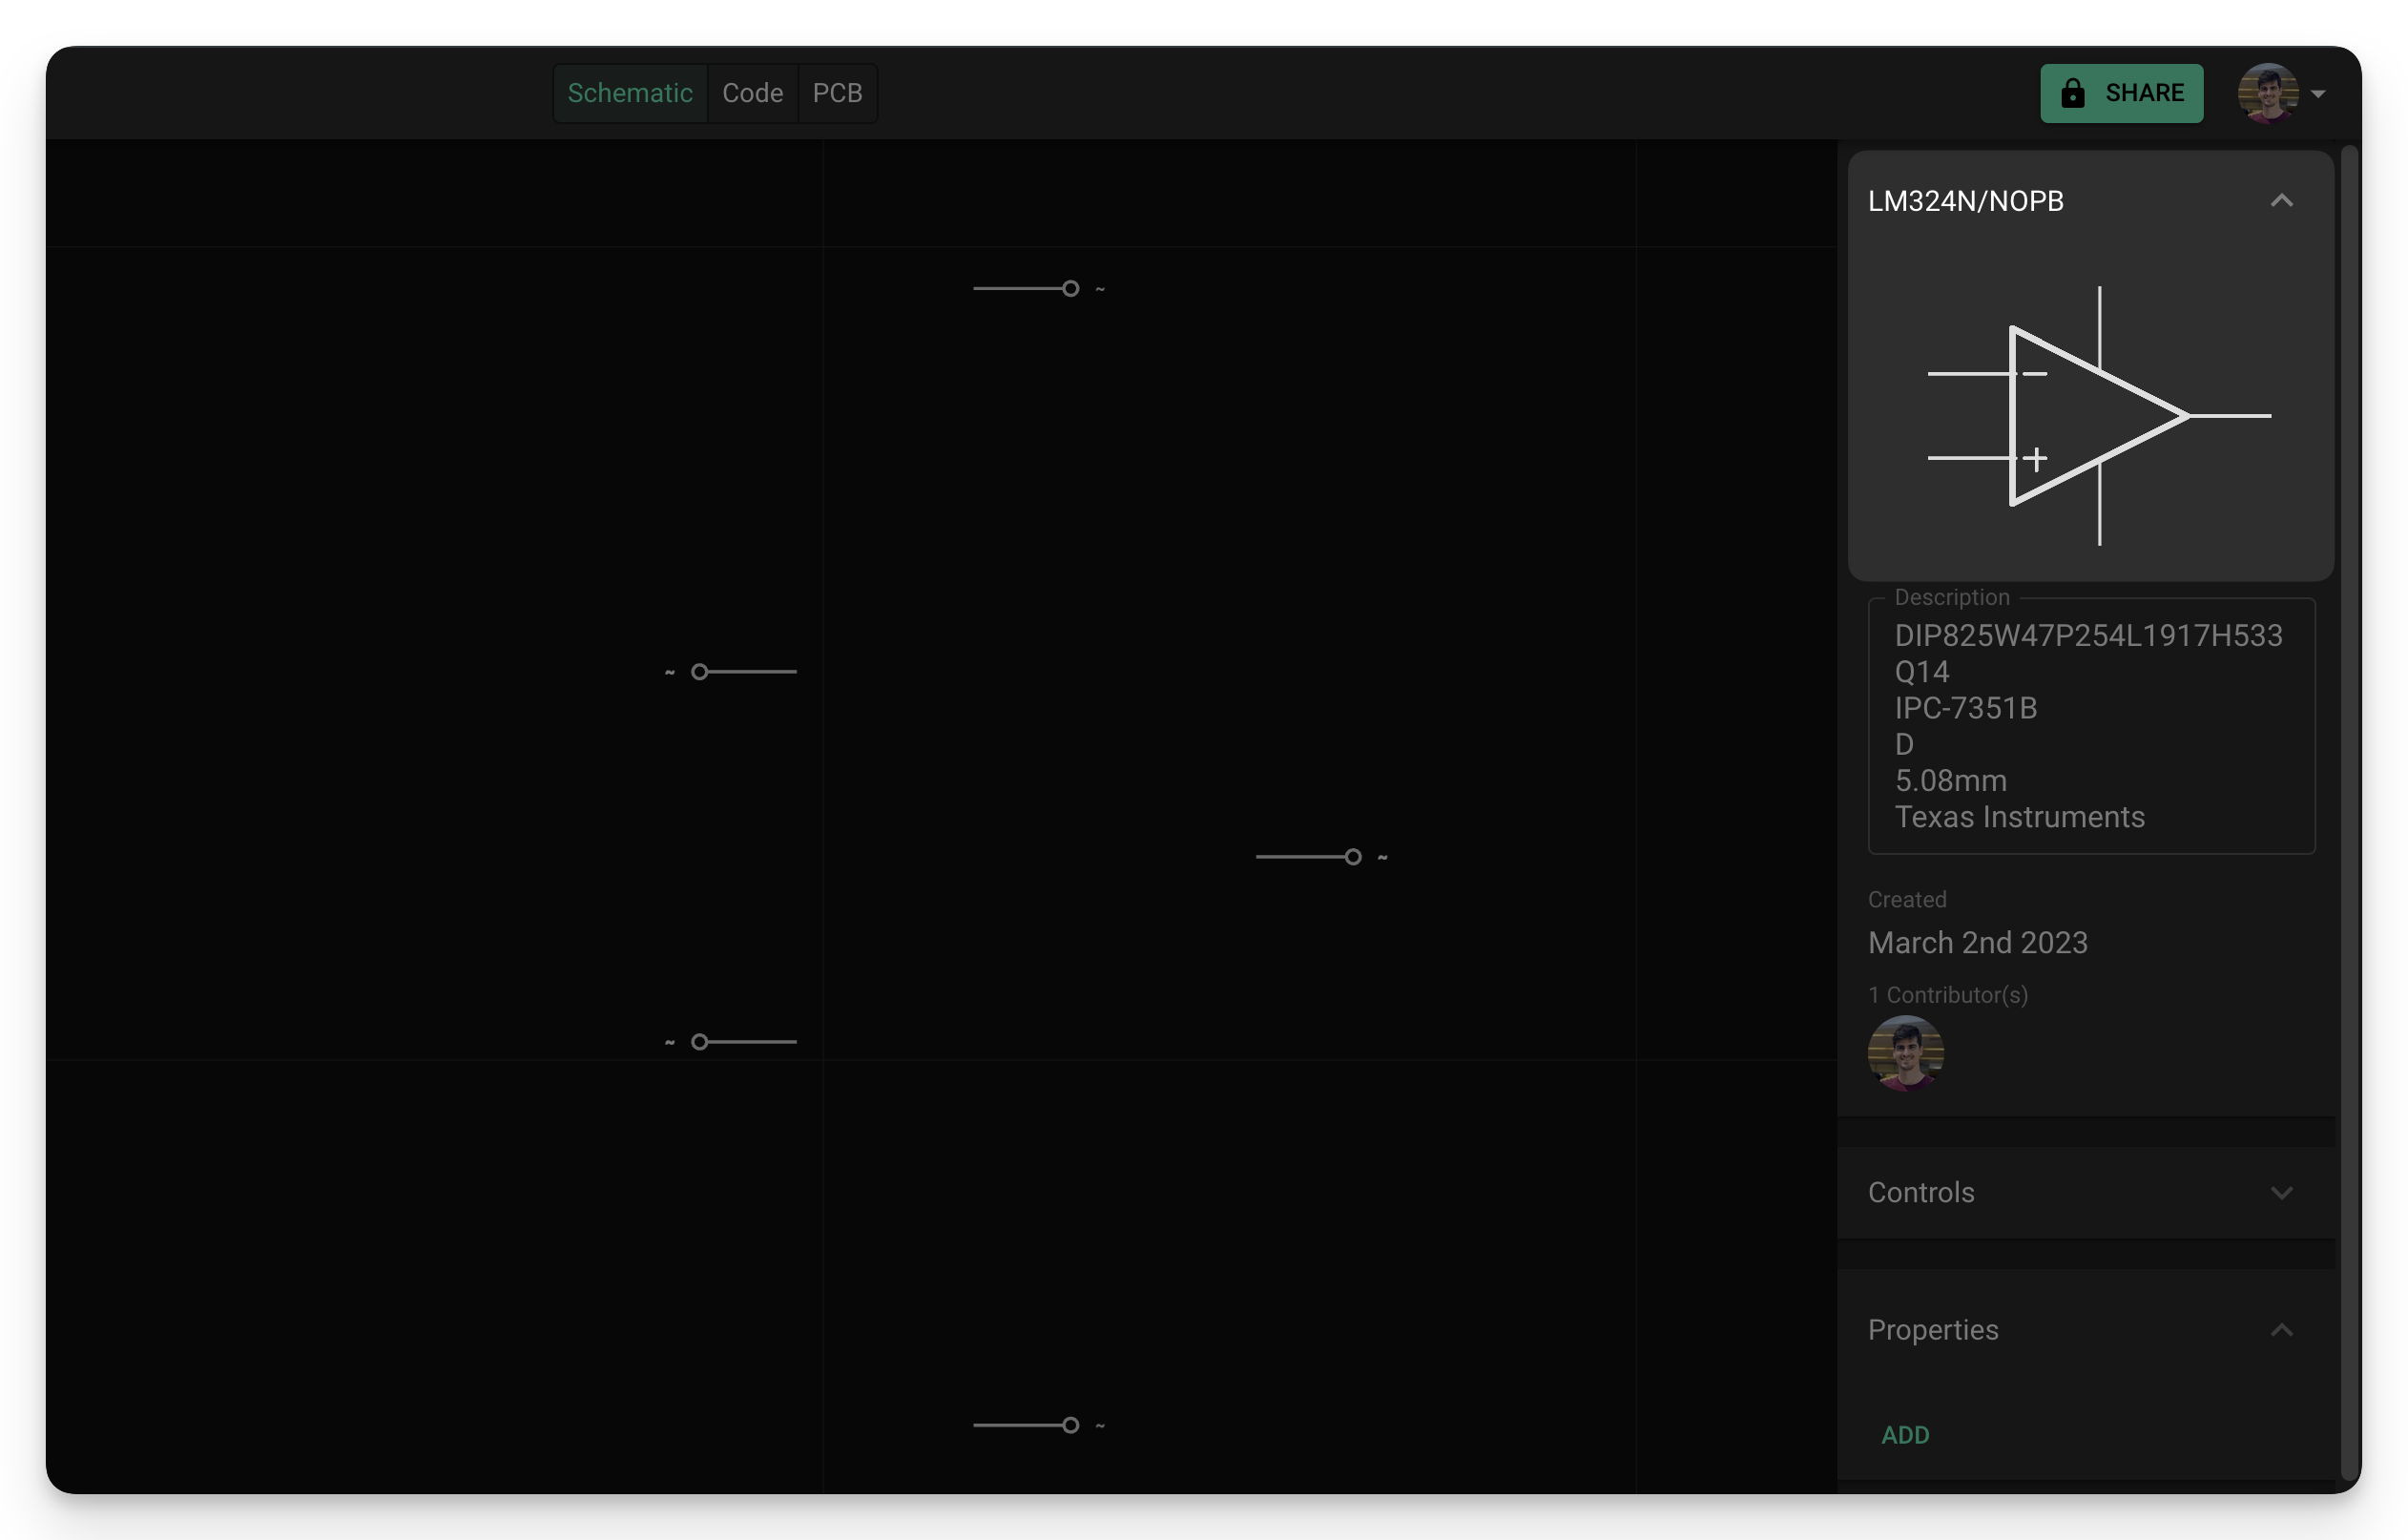
2.1 - Match the pin position with the symbol
By default, all terminals will be located at the center of the symbol. To position the terminals to the desired location, there are a few more steps. We've covered this process both in video and written format.
- Publish the part
- Create a New Blank Project and drag the part you're importing.
- You'll notice that both terminals are at the center of the symbol. Now go back to the imported part.
- You'll need to do this process for every terminal in your part
- Select the terminal and find the "Properties" menu in the right-side panel.
- In the "Symbol Pin Position" field, type the desired x and y coordinates for the terminal to sit on the symbol.
- Publish the part and go back to the new project. You'll see a "Update available for your parts" legend in the bottom left. Click on "Review" and accept the changes.
- You'll notice that the terminals have moved. You might need to repeat this process a few times to nail the perfect position.
3 - Importing a footprint
If your part already contains a ".kicad_mod" footprint file, you can import it directly into Flux. You can also download it from platforms like SnapEDA or Ultra Librarian, or create it from scratch in Flux.
Make sure the format of the part you want to import is KiCAD v4 or "KiCAD v4 or later".
To import the footprint:
3.1 - Add the footprint as an asset
To add an external file as an asset:
- Make sure no object has been selected (click on the empty canvas)
- On the right drawer, scroll down until you find the assets panel. Open it and click on "Add" (or "Manage"). This will open the assets dialogue.
- Then click on "Add item" and select the file from your local drive.
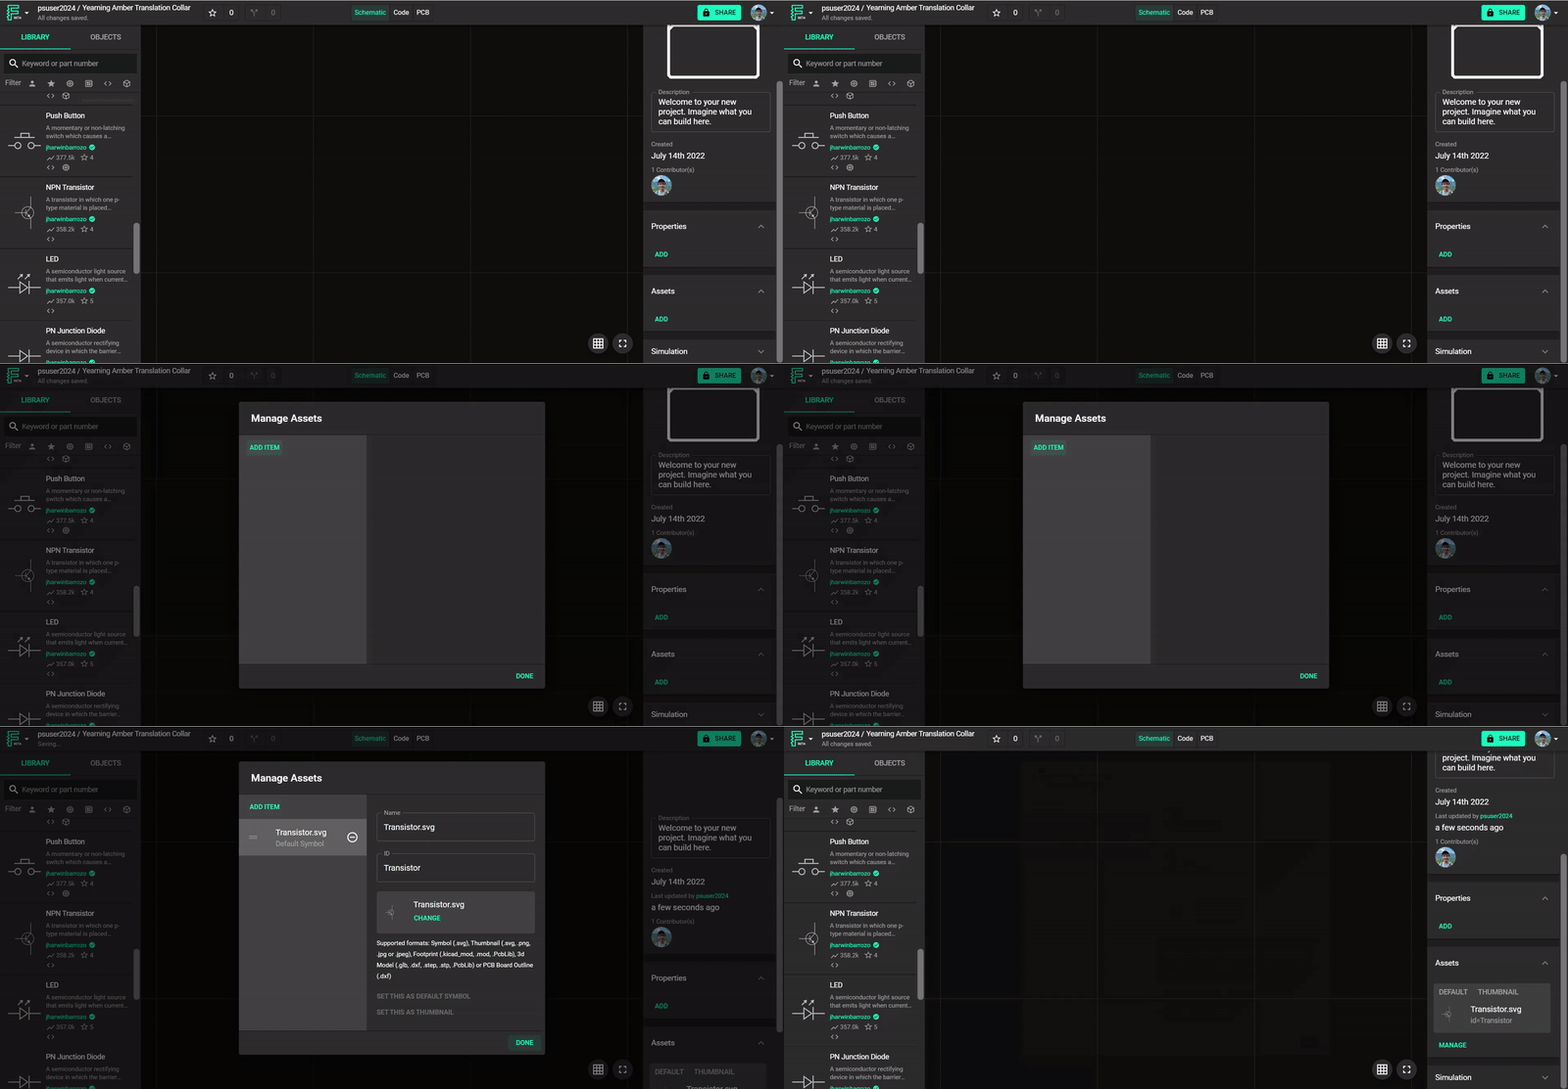
3.2 - Link the asset to the footprint
- Go to the PCB editor
- Go to the "Objects" menu on the left, click on the "Footprint" object to select it. You'll find it under "Root".
- Locate the "Object-specific rules" menu on the right-side panel and click "add".
- Find the rule called "Asset". You can type it in the search bar to find it faster.
- You'll see a new "Asset" rule with an input box. Type the name of the ".kicad_mod" footprint asset you just uploaded.
- You should now see your part's footprint on the canvas!
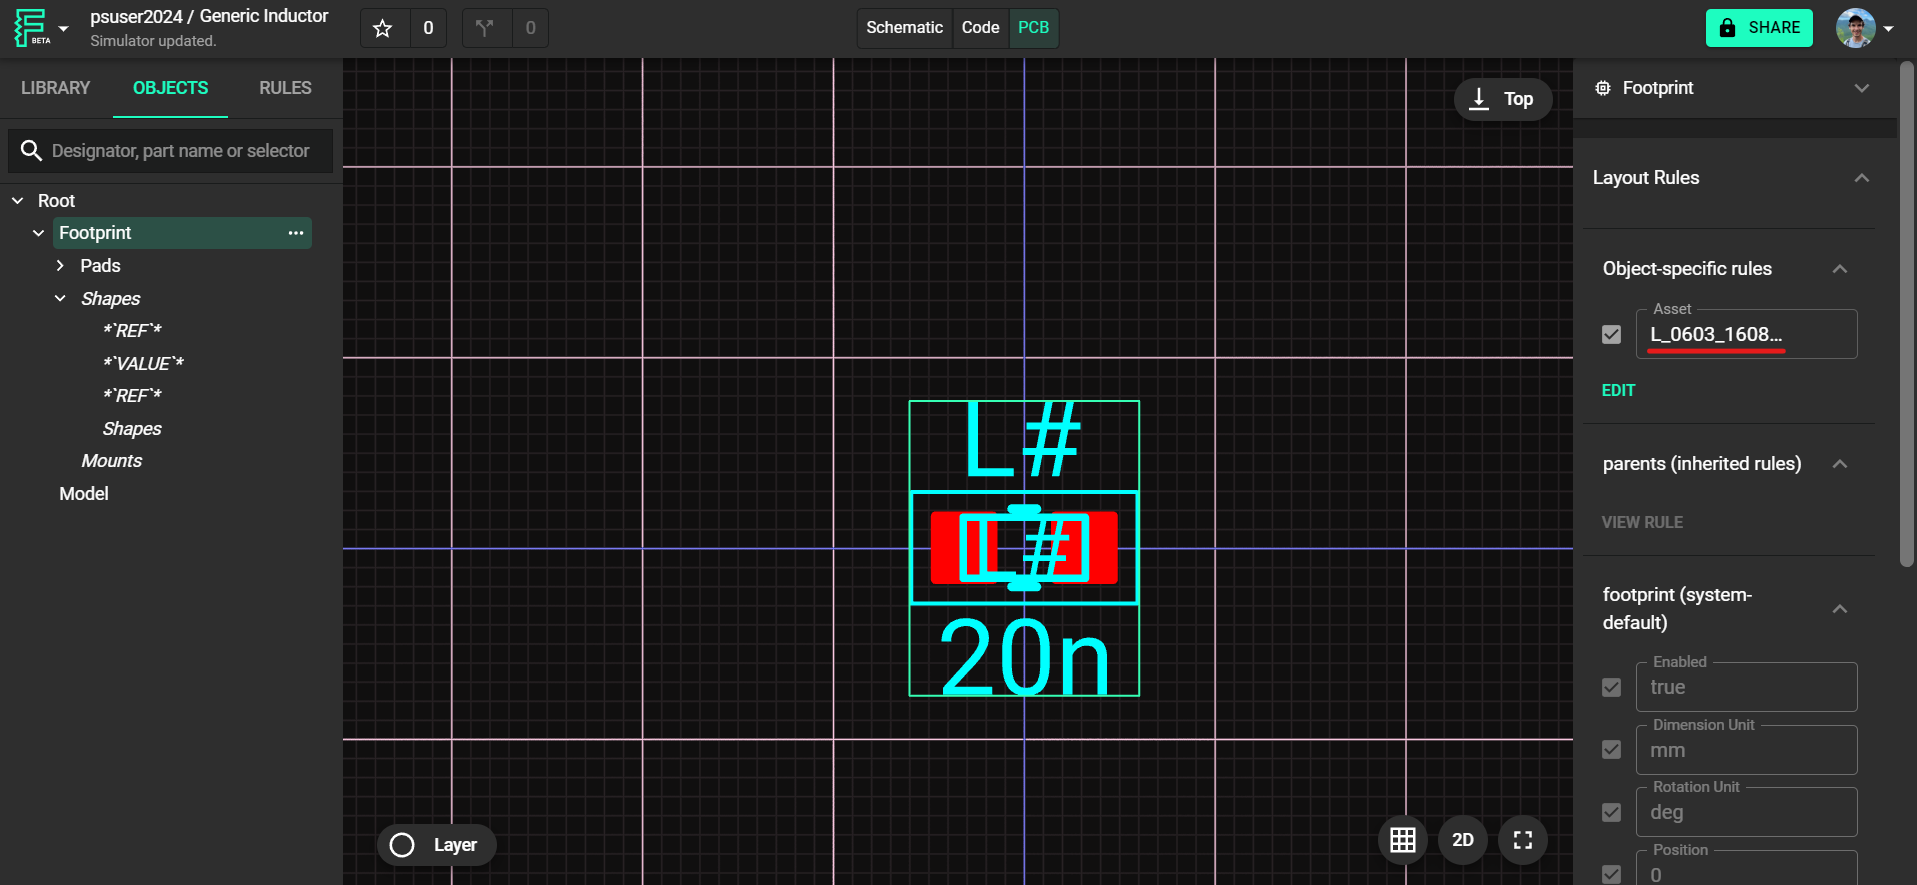
A footprint of an inductor imported to Flux via a ".kicad_mod" footprint file. The asset ID is listed in the "asset" property of the footprint object, allowing the footprint from the file to appear.
You can edit the imported footprint on the PCB Editor to remove unnecessary silkscreen elements or add/remove mounting holes.
3.3 - Modify the Imported Footprint
To modify the footprint you just imported, please refer to the working with footprints tutorial.
4- Importing a 3D model
- Go to the PCB editor
- Repeat the process in section 3.1 to add the 3D file as an asset.
- In the "Objects" panel on the left, right-click on the "Root" folder and select "Add" > "Model". This will create a new model object in the Objects panel.
- Under "Objects" on the left, click on the newly created "Model" under the root folder to select it.
- On the right in the inspector, click "add rule" under "Object-specific rules".
- In the popup, type "Asset" and click done.
- In the asset input, search for the file name used to upload the 3D file.
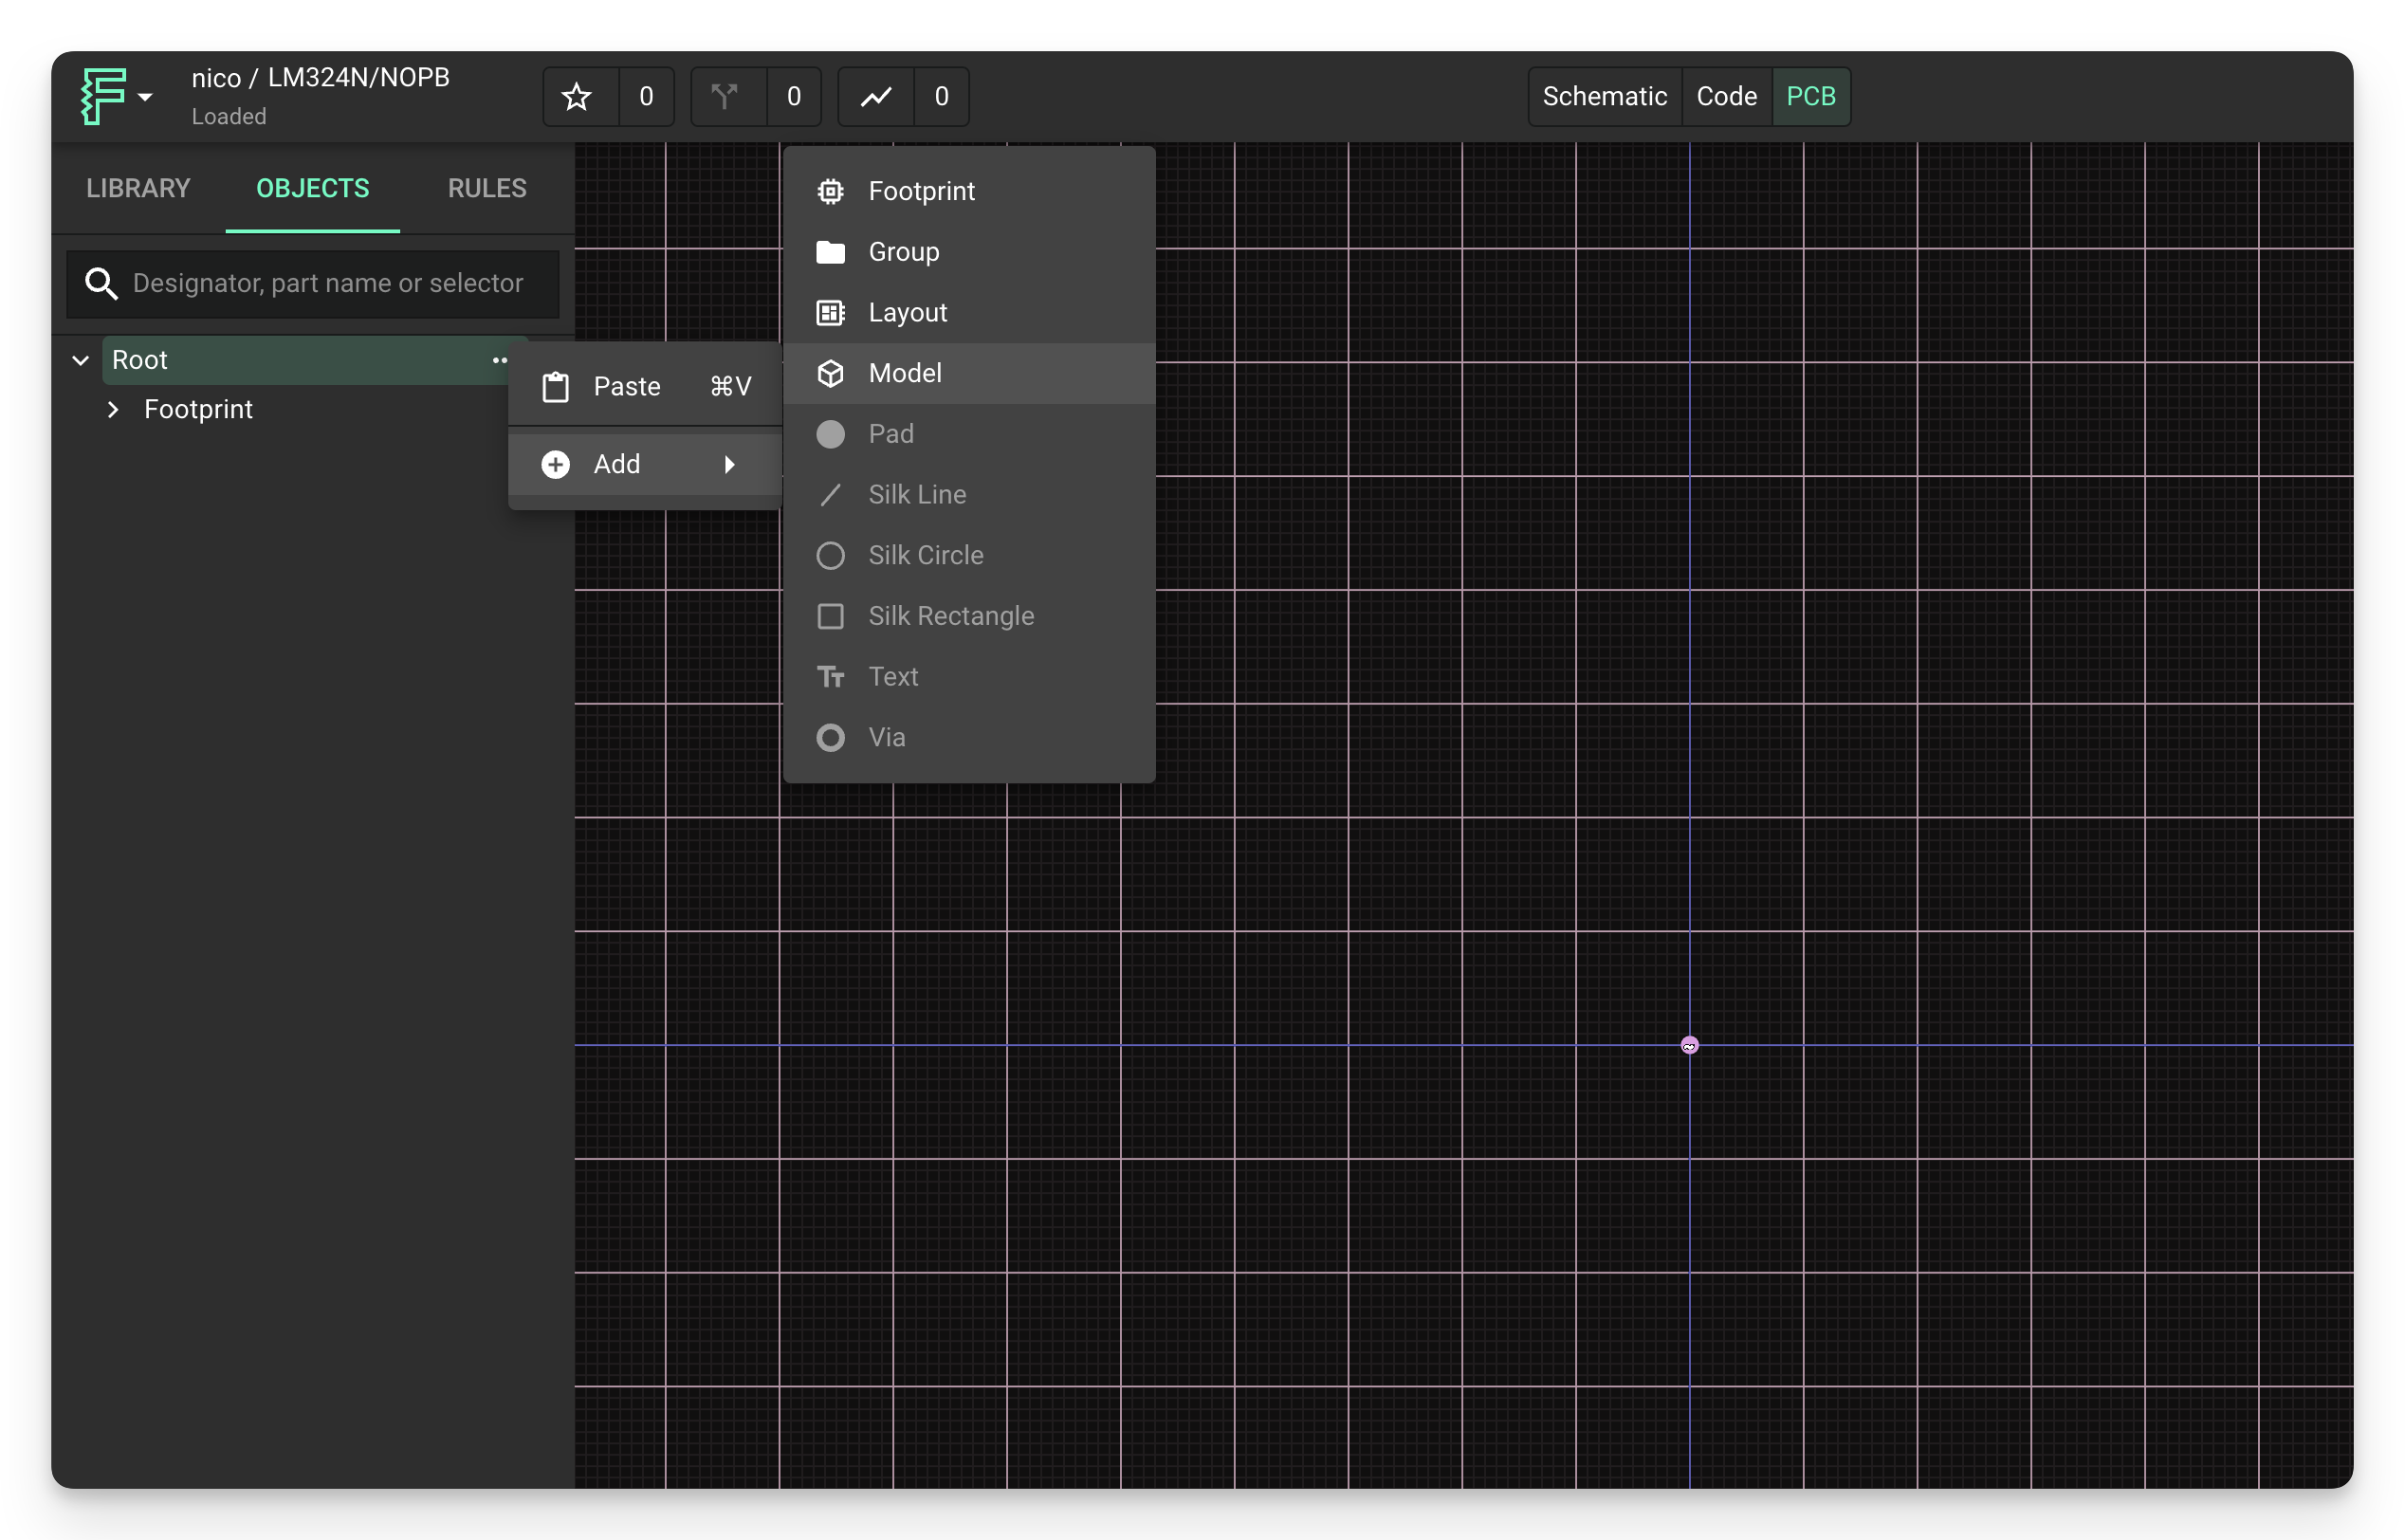
Changing the offset and orientation
Sometimes the model's orientation isn't correct when it's imported. If this is the case, you can change the orientation of the 3D model by adding another object-specific rule
- Click on the 3D model in the object browser
- Add another rule in the "Object-specific rules" section in the inspector on the right.
- Add the rule "Rotation". The input uses an "X Y Z" input style, so for example if you wanted to rotate the model 90 degrees about the Y axis you would enter "0 90 0".
- You can also add other rules, such as position and scale, to correctly orient your 3D model.
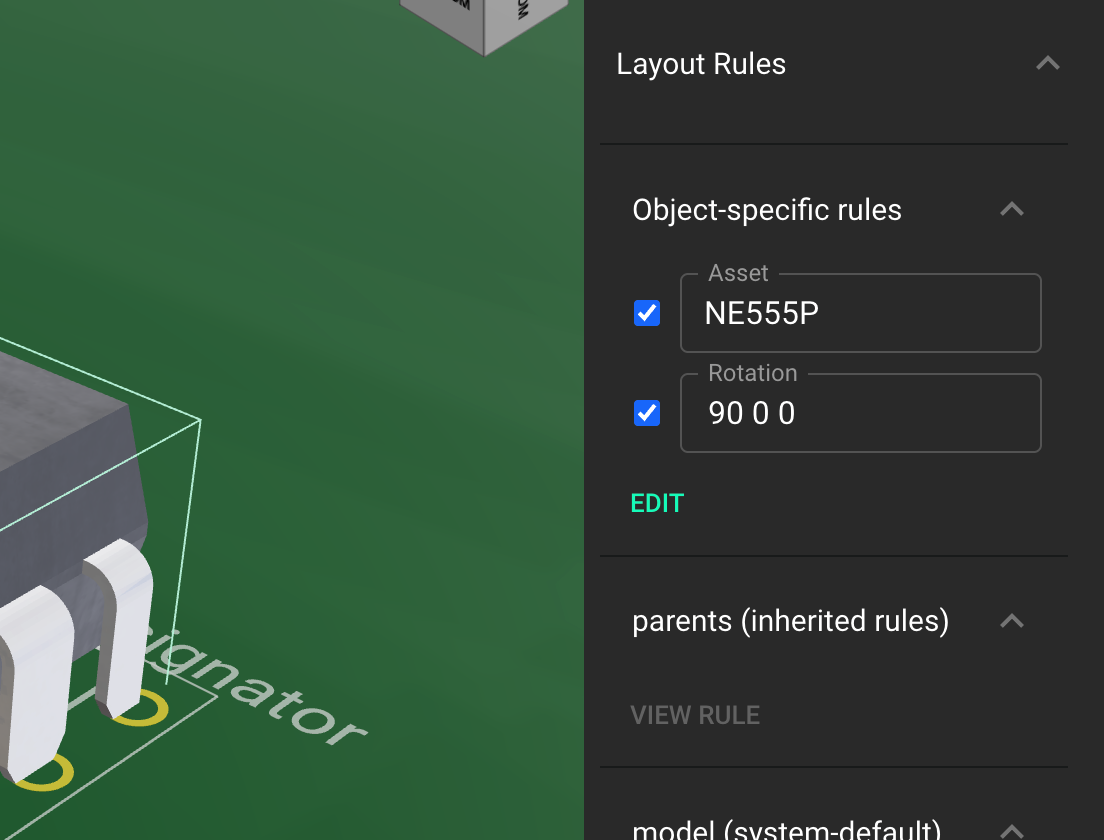
A display of the object-specific rules for a part showing the "Rotation" rule.
5- Importing a simulation model
Flux doesn't currently allow for importing simulation models. If you don't need a simulation model for your part, skip this step. Alternatively, take a look at this tutorial to add a simulation model.
6- Publishing to the library
We are almost there! You now need to publish your part to the library. Publishing is important because new projects in Flux don't show up in the library by default. You have to intentionally choose to share them there.
- Type
⌘Pon Mac orCtrl Pon Windows, or - Click on the Flux Menu in the upper left corner of the screen
- Choose "Publish to Library..."
- Select "Publish"

You will need to repeat the publishing step each time you make changes to your part. You can read more about the publishing process here.
Troubleshooting Common Issues
Import Failures
If your import fails:
- Verify the file format is KiCAD v4 or v5
- Check that the file isn't corrupted
- Try importing a simpler part first to verify the process
Missing Pins or Terminals
If pins or terminals are missing:
- Check the original library file for completeness
- Verify that all pins have proper names and numbers
- Try re-importing the file
Footprint Alignment Issues
If the footprint doesn't align properly:
- Check the orientation and scale settings
- Verify that the footprint matches the component specifications
- Adjust the position and rotation as needed
3D Model Problems
If the 3D model doesn't appear correctly:
- Verify the file format is supported
- Check the asset link is correct
- Adjust rotation, position, and scale as needed
Limitations
Flux's part importer has a few limitations:
- Only KiCAD and Eagle parts can be imported.
- kicad_mod files are footprint files, they do not contain a PCB layout.
- Importing parts from Altium, Eagle and other tools are in the roadmap.
What's Next
Now that you know how to import components, you might want to explore:
- Creating Components from Scratch - Learn to build custom components
- Working with Footprints - Customize and optimize footprints
- Working with Symbols - Create and modify schematic symbols
- Publishing a Part to the Library - Share your components with the community
Migrating from KiCAD to Flux?
We have a full tutorial on how to migrate from KiCAD to Flux. The tutorial guides you through the most important differences between KiCAD and Flux, and shows you how to import your components (footprints and libraries) from KiCAD. It also guides you through how to recreate schematics and PCB layouts, since it is not possible right now to import those from KiCAD.